Dressing Ye Part -- Part Six
 Today, I'll be showing you the construction of the jacket.
| RH201 - English Jacket |
This jacket is made using RH201 -- The English Jacket (seen at right), a pattern based on a number of extant jackets housed in museums in the UK and US. All of the extant garments are linen (or silk) jackets covered in elaborate embroidery. Indeed, their decorative excellent is probably why they have survived 400 years. However, contemporary paintings, like the one from the life of Mary Ward, above, show us that common women wore plain wool and linen versions of this same style jacket. I am making my jacket from a piece of lavender wool flannel that I had left over from a custom clothing order. I only had two yards, but, as I will show you, you can cut this jacket from as little as a yard and a half. I'll be lining it with a piece of our Osnaburg linen. The first step is checking the fit of the pattern. Even though I made this pattern using myself as the fit model, it is always a good idea to check the fit. Because I'm reasonably confident that the pattern is at least close to my size, I decided to check the fit with the lining material rather than making a muslin or toile out of scrap fabric.  The ba
 sted-together lining over my Effigy bodys on the dress form (Below the waist on the back is left open for ease because the gore slits have not yet been cut. In the final jacket, the gores will take this up.) I'm assembling this jacket using period tailoring techniques. This means sewing the lining to the outer material before sewing the pieces to each other. So I removed the basting stitches in the lining and used it to cut the wool. As you can see, all the pieces fit rather efficiently on a small amount of fabric. The collar, wings, cuffs and gores can be cut from the scraps later.
  Using the lining to cut the outer material (the ruler is laying at the 1.5 yard mark) Next, I turned the seam allowances towards each other and pressed them. This assembly technique is described in Janet Arnold's description of Margaret Layton's jacket and the Burrell jacket in Patterns of Fashion.
 Seam allowances turned towards each other and pressed If you've read anything I've written about period sewing techniques, you'll know that clothing was assembled in quite a different manner before the invention of the sewing machine. My explorations on this subject have been greatly aided by conversations with Maggie Forest and Laura Mellin. Simply put, even when we handsew today, we imitate the action of a sewing machine. We assemble our clothing as if we're going to sew it on a machine and then sew it by hand from the wrong side. In the 16th century, the pieces of a garment didn't need to lay flat to be sewn as they do if sewn by machine. Clothing assembly was much more three-dimensional. And to truly understand historical clothing, it's necessary to follow these assembly techniques at least once. Besides, period sewing techniques make for stronger seams and a longer wearing garment. Arnold describes the edges of the Burrell jacket as "the linen lining is stitched to the outer layer round the edges from the right side, raw edges turned in towards each other." Others have described the edges as hemmed and then top stitched. This gave me an idea. There is a stitch used often in 18th century men's coats that hems and top stitches in the same stitch. It's called the prick stitch and it was used to catch the lining to the cut edges of 18th century coats. It makes a very clean, sharp edges. I believe this is what was used to attach the lining to the outer material of these jackets as well. It's just the right stitch for the job. So I prick-stitched my linen lining to the wool outer material, inserting brass hooks and eyes as I went.
  On this side, it just looks like I'm catching the lining down with a blind stitch. See the tiny white stitches?
  But on this side, it looks like top stitching. Isn't it clever!
  Here are the hooks prick stitched into the edge.
  And here are the eyes.
  The hooks and eyes prick-stitched into the front edges and laid flat on the work table. Pretty... One of the benefits of using period sewing technique while constructing historical clothing -- especially closely-fitted garments like jackets -- is that the sewing technique help you fit the garment more effectively than modern techniques do. In period, the seam allowances of one piece were folded under and sewn to its neighbouring piece from the outside which can be done on the body while the garment is being worn (not by oneself, obviously). As you are sewing down the seams, you can adjust them as needed to perfectly fit. This is a huge improvement over turning the garment inside out and pulling the seam allowances until they fit, and then trying the garment on right-side out and adjusting for asymmetry, sewing and resewing, until the fit is right. This technique doesn't even require the wearer to remove the garment for it to be sewn.

 The pinned together jacket on the mannequin. Looking good!
  Close up of the front seam allowances turned under and laid over the back seam allowances The stitch used to join the seams in this manner is a variation on the whip stitch. The needle catches a few threads of the flat piece and then a few threads of the folded edge of the adjoining piece, continuing in whip stitch fashion until the end of the seam is reached.
  The whip stitch variation sewing the side seams together. The whipstitch made...
  ...and pulled together, almost disappearing under the fronts. The upper and lower sleeves are whipstitched together. I pressed the seam allowances toward each other and whipsticthed all four layers together. This is a seam treatment often found on the embroidered early 17th century jackets upon which my jacket is based. Next, I attached the sleeves. Now all that's left to do is slit the jacket body and insert the gores. At 4" from the front edge, I made a slit up to the waistline. I made another slit 3.5" from the first slit. Then I slit the center back as high as the waistline. Next, I pressed the seam allowances of the slits to the inside.
 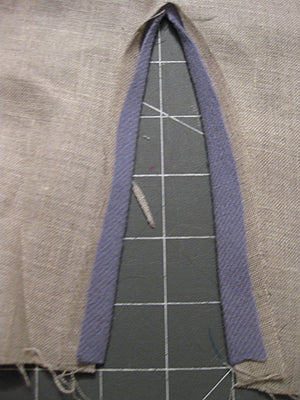 Then I laid a gore behind the slit, aligning the edges of the slit with the edges of the gore. I used the same stitching technique I used for the side seams to sew the gores into the slits.
Next, I'll trim the unsewn edges to even them, turn them towards each other, and prick stitch them to finish them. Then the jacket will be ready to wear. Me at Market Day at Birka wearing the jacket Tomorrow... Who can say?
© 2009 Kass McGann. All Rights Reserved. The Author of this work retains full copyright for this material. Permission is granted to make and distribute verbatim copies of this document for non-commercial private research or educational purposes provided the copyright notice, the author's name and website, and this permission notice are preserved on all copies.