
No, not the body on which the garment was found, you morbid corpse-watchers. The body of the Coat itself.
This week's installment looks at the main pieces of the Coat. In the
Introduction, we discussed briefly the historical data on record about the Killery outfit. To recap, Dunleavy in
Dress in Ireland posits that the Killery coat presents some significantly Medieval construction techniques, but dates it to the late-C16/early-C17 for a variety of reasons.
Kass disagrees. She thinks it's clearly mid- to late C17. While it does indeed go together with Medieval techniques — there's a
lot of similarity between Killery and the
Kragelund or
Greenland tunics — the shape of the Coat presents a silhouette which is precisely in line with garments we
know to be late-C17. It presents a silhouette as close to a Polish
Zupan or
Kontusz as makes no difference. Those styles came to prominence in Western Europe toward the end of C17, resulting in coats like the
Justacorps.
The Killery coat body is basically rectangles, triangles, and trapezoids. It's all straight lines, cunningly assembled to make a thing that
looks like a thing cut in the way the rest of Western Europe was cutting fabric — all curves and padding and whatnot.
[caption id="attachment_18235" align="alignright" width="169"]

Image 2[/caption]
In exactly the same way that the
Dungiven jacket is a distinctly Irish way to make something that looks like an Elizabethan doublet, the Killery coat and coats like it are Irish ways to get the look of a late-C17 man's coat.
And here's the kicker: Cutting a coat like Killery or Dungiven is crucially different than the "normal" contemporary way of cutting in that
it uses far less material to make the same sort of thing. The Dungiven, for example, uses one yard of broadcloth — ONE! — to make a doublet which, if you used European cutting techniques, requires
three yards.
[caption id="attachment_18241" align="alignleft" width="169"]
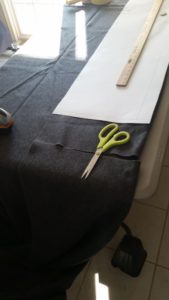
Image 3[/caption]
When you factor in the economic realities of Europe in the 17th century, where labor was bloody cheap compared to materials costs, you can see why those poor bog-trotters on the far fringe of Europe were compelled to construct fashionable garments in such a way. Consider the Italian city (I forget which one) [
He means Florence — Kass] where fashion demanded that brides wear gowns made of an exclusive brocade only woven for that occasion. That stuff cost more than your house! From it was made a gown that was not cut at all. It was only shaped by sewing that could later be undone without damaging the brocade. She sat for her portrait and had the ceremony and then they returned the fabric to its original rectangular shapes. After which her loving dad would sell the damn fabric on in a depressing attempt to recoup at least
some of his investment. [
See RH510 for more — Kass]
That's what Kass thinks, and it's a very compelling argument. Also, where is that voice coming from?
[caption id="attachment_18242" align="alignright" width="169"]

Image 4[/caption]
That explains what we're seeing when we look at the Killery today. Unfortunately for my purposes, the poor chap who died and sank into the bog in Killery parish
was significantly smaller than me, so I have to make it larger. Fortunately, I work for a pattern company which has a lot of selection when it comes to stuff I can use to get close to the Killery's dimensions but in my size, which is closer to "fat-ass American" than "famine-starved Irish." The photo up top shows the starting point, which involved measuring tape (for me), Dress in Ireland and more usefully our notes from when we examined Killery (for data), a ruler and a pencil (for adjusting the pattern), and the pattern itself.
[caption id="attachment_18259" align="alignleft" width="169"]

Image 5[/caption]
Image 2 is what all those tools made — a rectangle. But that rectangle is going to replicate a bog find, so lay off me.
Now we get to cut some rectangles. Into those rectangles gores will be strategically placed to get the full skirt found on the original. But today we're cutting rectangles and straight lines.
I'm just happy to be entrusted with sharp scissors. Although after I realized I'd thrown away the bit of the pattern where we wrote down all the calculations I'd require for this step, I deeply doubted that trust.
[caption id="attachment_18260" align="alignright" width="169"]
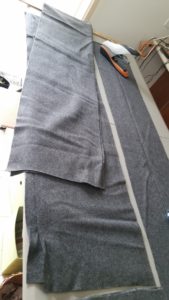
Image 6[/caption]
Image 3 is the initial layout. The fabric is doubled, because while I could cut more efficiently by cutting through four layers, this melton is thick. Two layers is all my scissors and fingers can handle. I plan to make this unlined, as the original was unlined (or there's no evidence of lining). If I were going to line it, I could have made it from a lighter-weight material and cut all four body panels at once.
Image 4 is the back piece cut. As it's easier to do while it's folded, I've cut the slit for the back gores at this time. We'll talk all about the Gores in next week's installment.
Image 5 is the fronts cut out. It's done in the same way as the back piece in that it's cut on the fold. To get the fronts I simply cut the large rectangle into two smaller rectangles along the line of the fold. You can see the folded back piece lying atop the fronts in Image 6.
The next step is putting the fronts onto the back. Stay tuned for that!
P.S. Forgive the rather blurry photos. The camera on my ancient phone isn't the best.
P.P.S. Here's the pre-order link for our Killery pattern:
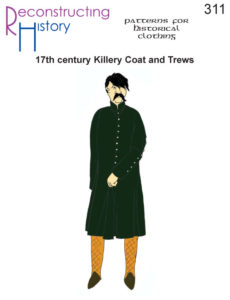
Pre-order yours now!