The Killery Coat — The Collar
The bog was dark and desolate. The wind off Lough Gill was bitter, bringing the earthy reek of peat, and piercing through the wool of your father's coat to chill your bones.
You turned, put the view of Parke's Castle to your back, nothing more than it deserved, built as it was on the bones of Briain Uí Ruairc and his ancestral home, and plodded on toward Baile an Tóchair. You overstayed your welcome at Aoife's father's house, and had decided to risk a short-cut over the bog rather than the road, better to get home the quicker.
Suddenly, from behind you heard the sound of hoofbeats. "You there!" a voice shouted. Frightened, you began to run, on the path because the bog was too treacherous to leave the well-trodden ways. But the hoofbeats thundered up behind, overtaking you in a matter of moments. You whirled and stepped off the path, shoes squelching in the acidic brown bog-water. You vaguely felt the back of your coat tear as you threw up your hands in a vain attempt to ward off the Englishman's cudgel.
When the stick connected with your head, you fell into the welcoming embrace of the bog. As the light faded, you heard the hoofbeats fade away along with your hope of ever seeing Aoife again.
Okay, so that's probably not what really happened. But it's how I work in my other job; I see a thing, I make up a somewhat plausible story to explain what I see, and I write it down.
So what did I see which inspired that? The Killery Coat has a very fragmentary area at the back of the neck. There's no way to know what the back of the collar looked like, much less what happened to it. All that remains is a few threads.
[WARNING! WARNING! CONJECTURE ALERT! — Kass]
But the way the rest of the coat is put together indicates a stress area at that location. Look at the old TV show of The Incredible Hulk, when Bill Bixby turned into Lou Ferrigno. The first place to blow out of Dr Banner's shirt was the upper back, as the growing Hulk flexed. Can you blame me if my mind started to wonder what happened to make the Killery coat blow out in a similar way? I mean, The Hulk isn't Irish, even if he is green, so I can't just use that.
[Really? I mean... REALLY?! — Kass]
[caption id="attachment_18675" align="alignleft" width="300"]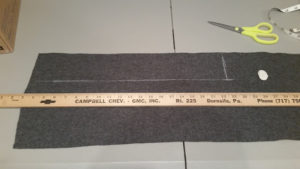 Fig 1[/caption]
Anyway, I should probably get to the actual construction details now. [Thank the heavens! — Kass]
If you look back at the previous posts, the Body and the Gores posts, you'll remember we're dealing with a
[caption id="attachment_18676" align="alignright" width="300"]
Fig 1[/caption]
Anyway, I should probably get to the actual construction details now. [Thank the heavens! — Kass]
If you look back at the previous posts, the Body and the Gores posts, you'll remember we're dealing with a
[caption id="attachment_18676" align="alignright" width="300"] Fig 2[/caption]
coat constructed of basic geometric shapes. It's all rectangles, triangles, and trapezoids. Moreover, it's basic geometric shapes cut from what we consider really narrow loom widths.
This helps to keep costs down. The basic rule of thumb in terms of the economics of making stuff from prehistory until the Industrial Revolution is that labor is cheap and materials are expensive (the inverse is true now).
Nothing has changed in the collar. It's just a rectangle, about 20" long by 3" wide. See Fig 1.
NB: I'm going to make the collar of two layers of material, because even though it's melton it's still a bit too floppy, and I want it to stand up nice and tall.
[caption id="attachment_18677" align="alignleft" width="300"]
Fig 2[/caption]
coat constructed of basic geometric shapes. It's all rectangles, triangles, and trapezoids. Moreover, it's basic geometric shapes cut from what we consider really narrow loom widths.
This helps to keep costs down. The basic rule of thumb in terms of the economics of making stuff from prehistory until the Industrial Revolution is that labor is cheap and materials are expensive (the inverse is true now).
Nothing has changed in the collar. It's just a rectangle, about 20" long by 3" wide. See Fig 1.
NB: I'm going to make the collar of two layers of material, because even though it's melton it's still a bit too floppy, and I want it to stand up nice and tall.
[caption id="attachment_18677" align="alignleft" width="300"] Fig 3[/caption]
Attaching it took some fiddling. See Fig 2? That's what happens when your coat's body pieces are rectangles and you need an opening to stick your neck through: you get miniature lapels. As you recall, the body is comprised of two fronts on one back; the fronts are half as wide as the backs, giving a front opening.
[caption id="attachment_18678" align="alignright" width="169"]
Fig 3[/caption]
Attaching it took some fiddling. See Fig 2? That's what happens when your coat's body pieces are rectangles and you need an opening to stick your neck through: you get miniature lapels. As you recall, the body is comprised of two fronts on one back; the fronts are half as wide as the backs, giving a front opening.
[caption id="attachment_18678" align="alignright" width="169"]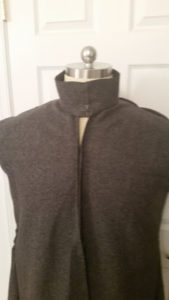 Fig 4[/caption]
In order to give a neck opening, you can't stitch the shoulders all the way closed. So there's some excess fabric which looks like lapels when you tuck it out of the way.
To attach the collar, I folded it in half, then marked it and the center of the back at the same time. Fig 3 shows the back of the neck of the body.
Like a dummy, I totally forgot to take a picture of the collar tacked onto the back before I basted it on with pins. So you don't get to see that part.
You do get to see what it looks like when basted on all the way round. That's Fig 4.
[caption id="attachment_18679" align="alignleft" width="169"]
Fig 4[/caption]
In order to give a neck opening, you can't stitch the shoulders all the way closed. So there's some excess fabric which looks like lapels when you tuck it out of the way.
To attach the collar, I folded it in half, then marked it and the center of the back at the same time. Fig 3 shows the back of the neck of the body.
Like a dummy, I totally forgot to take a picture of the collar tacked onto the back before I basted it on with pins. So you don't get to see that part.
You do get to see what it looks like when basted on all the way round. That's Fig 4.
[caption id="attachment_18679" align="alignleft" width="169"] Fig 5[/caption]
Getting it to that point made something very, very interesting happen.
Take a look at Fig 5. See that little point of fabric riding up the side of the neck? That's the corner of the "lapel" left over when the front is folded out of the way of the neck.
That's very interesting, for a variety of reasons.
[caption id="attachment_18681" align="alignright" width="219"]
Fig 5[/caption]
Getting it to that point made something very, very interesting happen.
Take a look at Fig 5. See that little point of fabric riding up the side of the neck? That's the corner of the "lapel" left over when the front is folded out of the way of the neck.
That's very interesting, for a variety of reasons.
[caption id="attachment_18681" align="alignright" width="219"] Fig 6[/caption]
On the original Killery, there's a very small triangle of material between the collar and the front. See the sketch in Fig 6.
That little triangle is the same shape and size as the triangle I'd have to cut away to get that "lapel" off the inside of the collar.
That little triangle is necessary when you cut away the lapel to make a neck opening, then attach a rectangular collar and end up staring at a hole where material should be.
That, my little hedgehogs, is what we call "using every damn bit of material because do you have any idea how much fabric costs what do you think it grows on trees I'm not made of money you know."
[caption id="attachment_18682" align="alignleft" width="212"]
Fig 6[/caption]
On the original Killery, there's a very small triangle of material between the collar and the front. See the sketch in Fig 6.
That little triangle is the same shape and size as the triangle I'd have to cut away to get that "lapel" off the inside of the collar.
That little triangle is necessary when you cut away the lapel to make a neck opening, then attach a rectangular collar and end up staring at a hole where material should be.
That, my little hedgehogs, is what we call "using every damn bit of material because do you have any idea how much fabric costs what do you think it grows on trees I'm not made of money you know."
[caption id="attachment_18682" align="alignleft" width="212"] Fig 7[/caption]
The way it looks now, I'll probably not need to cut it away and stitch it somewhere else. I know Fig 4 looks like there's a big gap in the front of the neck, but that's just how it's on the mannequin. The collar is pinned with overlap, and it's about 2" longer than it needs to be in order to meet at the front on my neck. So if I bung a button on the body right where the collar and body meet, it'll probably fit perfectly. See Fig 7.
Our next installment will feature How Bob Tackles These Weird Sleeves. And OH, my little Corgi pups, they are a RIGHT pain in the jacksie.
Until then, keep sewing!
P.S. There's still time to get in on the Early Bird Supah Sekrit Pre-Order for the RH311 Killery Coat pattern! Click the pattern cover below.
[caption id="attachment_18104" align="aligncenter" width="230"]
Fig 7[/caption]
The way it looks now, I'll probably not need to cut it away and stitch it somewhere else. I know Fig 4 looks like there's a big gap in the front of the neck, but that's just how it's on the mannequin. The collar is pinned with overlap, and it's about 2" longer than it needs to be in order to meet at the front on my neck. So if I bung a button on the body right where the collar and body meet, it'll probably fit perfectly. See Fig 7.
Our next installment will feature How Bob Tackles These Weird Sleeves. And OH, my little Corgi pups, they are a RIGHT pain in the jacksie.
Until then, keep sewing!
P.S. There's still time to get in on the Early Bird Supah Sekrit Pre-Order for the RH311 Killery Coat pattern! Click the pattern cover below.
[caption id="attachment_18104" align="aligncenter" width="230"]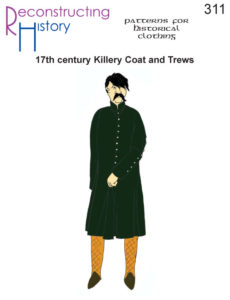 Order yours now![/caption]
Fig 1[/caption]
Anyway, I should probably get to the actual construction details now. [Thank the heavens! — Kass]
If you look back at the previous posts, the Body and the Gores posts, you'll remember we're dealing with a
[caption id="attachment_18676" align="alignright" width="300"] Fig 2[/caption]
coat constructed of basic geometric shapes. It's all rectangles, triangles, and trapezoids. Moreover, it's basic geometric shapes cut from what we consider really narrow loom widths.
This helps to keep costs down. The basic rule of thumb in terms of the economics of making stuff from prehistory until the Industrial Revolution is that labor is cheap and materials are expensive (the inverse is true now).
Nothing has changed in the collar. It's just a rectangle, about 20" long by 3" wide. See Fig 1.
NB: I'm going to make the collar of two layers of material, because even though it's melton it's still a bit too floppy, and I want it to stand up nice and tall.
[caption id="attachment_18677" align="alignleft" width="300"] Fig 3[/caption]
Attaching it took some fiddling. See Fig 2? That's what happens when your coat's body pieces are rectangles and you need an opening to stick your neck through: you get miniature lapels. As you recall, the body is comprised of two fronts on one back; the fronts are half as wide as the backs, giving a front opening.
[caption id="attachment_18678" align="alignright" width="169"] Fig 4[/caption]
In order to give a neck opening, you can't stitch the shoulders all the way closed. So there's some excess fabric which looks like lapels when you tuck it out of the way.
To attach the collar, I folded it in half, then marked it and the center of the back at the same time. Fig 3 shows the back of the neck of the body.
Like a dummy, I totally forgot to take a picture of the collar tacked onto the back before I basted it on with pins. So you don't get to see that part.
You do get to see what it looks like when basted on all the way round. That's Fig 4.
[caption id="attachment_18679" align="alignleft" width="169"] Fig 5[/caption]
Getting it to that point made something very, very interesting happen.
Take a look at Fig 5. See that little point of fabric riding up the side of the neck? That's the corner of the "lapel" left over when the front is folded out of the way of the neck.
That's very interesting, for a variety of reasons.
[caption id="attachment_18681" align="alignright" width="219"] Fig 6[/caption]
On the original Killery, there's a very small triangle of material between the collar and the front. See the sketch in Fig 6.
That little triangle is the same shape and size as the triangle I'd have to cut away to get that "lapel" off the inside of the collar.
That little triangle is necessary when you cut away the lapel to make a neck opening, then attach a rectangular collar and end up staring at a hole where material should be.
That, my little hedgehogs, is what we call "using every damn bit of material because do you have any idea how much fabric costs what do you think it grows on trees I'm not made of money you know."
[caption id="attachment_18682" align="alignleft" width="212"] Fig 7[/caption]
The way it looks now, I'll probably not need to cut it away and stitch it somewhere else. I know Fig 4 looks like there's a big gap in the front of the neck, but that's just how it's on the mannequin. The collar is pinned with overlap, and it's about 2" longer than it needs to be in order to meet at the front on my neck. So if I bung a button on the body right where the collar and body meet, it'll probably fit perfectly. See Fig 7.
Our next installment will feature How Bob Tackles These Weird Sleeves. And OH, my little Corgi pups, they are a RIGHT pain in the jacksie.
Until then, keep sewing!
P.S. There's still time to get in on the Early Bird Supah Sekrit Pre-Order for the RH311 Killery Coat pattern! Click the pattern cover below.
[caption id="attachment_18104" align="aligncenter" width="230"] Order yours now![/caption]