The Killery Coat - The Gores
[caption id="attachment_18469" align="alignleft" width="224"]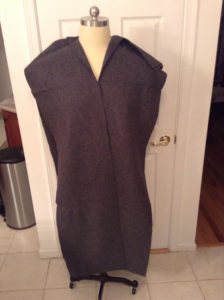 Fig 1[/caption]
[caption id="attachment_18470" align="alignright" width="224"]
Fig 1[/caption]
[caption id="attachment_18470" align="alignright" width="224"] Fig 2[/caption]
...and a little more about the body, which we discussed last time.
So the rectangles which make up the body are now on my dress dummy. The shoulder "seams" are pinned into place.
Well, I say place. We're still futzing with it. Because in the interest of keeping this as simple as Kass thinks the Killery Coat is made, we're not cutting a neckline out of the back piece.
(The pics are really crappy. Again, my phone hasn't got the best camera.)
Take a look at the images. The back view (Fig 2) has no shaping to the top of the back piece at all. It's just placed at the spot on the back of the neck where we want it to end up. Then the fronts are pinned along the shoulder seam to damn near the center-back line (don't forget the fronts are the same size rectangle as the back, except the rectangle is slit up the middle).
[caption id="attachment_18471" align="alignleft" width="224"]
Fig 2[/caption]
...and a little more about the body, which we discussed last time.
So the rectangles which make up the body are now on my dress dummy. The shoulder "seams" are pinned into place.
Well, I say place. We're still futzing with it. Because in the interest of keeping this as simple as Kass thinks the Killery Coat is made, we're not cutting a neckline out of the back piece.
(The pics are really crappy. Again, my phone hasn't got the best camera.)
Take a look at the images. The back view (Fig 2) has no shaping to the top of the back piece at all. It's just placed at the spot on the back of the neck where we want it to end up. Then the fronts are pinned along the shoulder seam to damn near the center-back line (don't forget the fronts are the same size rectangle as the back, except the rectangle is slit up the middle).
[caption id="attachment_18471" align="alignleft" width="224"] Fig 3[/caption]
[caption id="attachment_18472" align="alignright" width="300"]
Fig 3[/caption]
[caption id="attachment_18472" align="alignright" width="300"] Fig 4[/caption]
The cool part is when you do that the fronts start looking like the Killery as it exists. See Fig 1.
There will be more on the collar and how it attaches in later installments. You're going to have to stay tuned for that.
Before I go on to the gores, let me put in a word about tools. USE GOOD SCISSORS. If you're going to use wool as thick as the melton I chose, it takes a machete or a hacksaw or laser beams or some shit to get through more than one layer of it. I thought I had a pretty decent pair of scissors. Got 'em at Joann. Nice and sharp. Cuts the hell out of my fingers when I'm not being careful. I'm not allowed to run with them. Should be good, right?
Not really, no. Hacking through two layers was an arthritic trial. So get good, sharp scissors and make sure they stay sharp.
Oh, and before we get into why you need good scissors, take a look at the crumpled up piece of paper in Fig 3.
[caption id="attachment_18473" align="alignleft" width="300"]
Fig 4[/caption]
The cool part is when you do that the fronts start looking like the Killery as it exists. See Fig 1.
There will be more on the collar and how it attaches in later installments. You're going to have to stay tuned for that.
Before I go on to the gores, let me put in a word about tools. USE GOOD SCISSORS. If you're going to use wool as thick as the melton I chose, it takes a machete or a hacksaw or laser beams or some shit to get through more than one layer of it. I thought I had a pretty decent pair of scissors. Got 'em at Joann. Nice and sharp. Cuts the hell out of my fingers when I'm not being careful. I'm not allowed to run with them. Should be good, right?
Not really, no. Hacking through two layers was an arthritic trial. So get good, sharp scissors and make sure they stay sharp.
Oh, and before we get into why you need good scissors, take a look at the crumpled up piece of paper in Fig 3.
[caption id="attachment_18473" align="alignleft" width="300"] Fig 5[/caption]
See that? That's what happens when you throw the crucially important piece of paper you thought was good only for recycling but which has a bunch of really important measurements you absolutely need scribbled on it in pencil. Stuff your costume-historian wife carefully and kindly wrote out for you. Stuff based on her getting onto an airplane and flying to Ireland so she could make a careful examination of an extant garment. Stuff that lets you cut the right kind of gores in the right shapes with the right measurements.
Yeah, don't throw that away. If you do, you'll go diving in to the garbage cans looking for it. Take it from me, folks.
[caption id="attachment_18474" align="alignright" width="300"]
Fig 5[/caption]
See that? That's what happens when you throw the crucially important piece of paper you thought was good only for recycling but which has a bunch of really important measurements you absolutely need scribbled on it in pencil. Stuff your costume-historian wife carefully and kindly wrote out for you. Stuff based on her getting onto an airplane and flying to Ireland so she could make a careful examination of an extant garment. Stuff that lets you cut the right kind of gores in the right shapes with the right measurements.
Yeah, don't throw that away. If you do, you'll go diving in to the garbage cans looking for it. Take it from me, folks.
[caption id="attachment_18474" align="alignright" width="300"] Fig 6[/caption]
After retrieving my essential data from the trash, I set to work on the fabric cutting part of today's adventure. First I had to lay out what I was going to cut.
The gores are simple trapezoids cut on the straight. There's a total of six - one for each side seam, and two each for the front and back openings. The front and back gores are essentially the same size as the side gores, just slit up the middle. This lets the Coat open in front. The back one lets you sit a horse.*
Two layers of fabric (remember what I said about the scissors?) are laid out in Fig 4.
Time for a word about loom widths. On the original Killery, the big pieces are mostly loom widths, commonly 20 to 22 inches wide. When you keep the pieces to simple rectangles or trapezoids cut from rectangles, you get very, very little waste. That's important when you're a dirt-poor bog-trotter and material is super expensive.
[caption id="attachment_18480" align="alignright" width="224"]
Fig 6[/caption]
After retrieving my essential data from the trash, I set to work on the fabric cutting part of today's adventure. First I had to lay out what I was going to cut.
The gores are simple trapezoids cut on the straight. There's a total of six - one for each side seam, and two each for the front and back openings. The front and back gores are essentially the same size as the side gores, just slit up the middle. This lets the Coat open in front. The back one lets you sit a horse.*
Two layers of fabric (remember what I said about the scissors?) are laid out in Fig 4.
Time for a word about loom widths. On the original Killery, the big pieces are mostly loom widths, commonly 20 to 22 inches wide. When you keep the pieces to simple rectangles or trapezoids cut from rectangles, you get very, very little waste. That's important when you're a dirt-poor bog-trotter and material is super expensive.
[caption id="attachment_18480" align="alignright" width="224"] Fig 8[/caption]
[caption id="attachment_18478" align="alignleft" width="224"]
Fig 8[/caption]
[caption id="attachment_18478" align="alignleft" width="224"] Fig 7[/caption]
Fig 5 has the gores laid out in that fashion. The trapezoid in the center is the side gore. Fig 6 has the gores cut out, ready for installation.
Figs 7 and 8 are the gores pinned into the body. Already the skirts look like they're going to have damn near Captain Jack Harkness levels of swish.
That's a thing I can live with. Ask anyone.
Check out the detail in Fig 8. This is the result of us futzing around trying to replicate a unique detail on the original.
Fig 9 is a sketch of the original. Look closely at the top of the side gores.
The top of each gore is outside the body of the coat. It's like they decided to just not set the gore "properly," where the point is enclosed in the nexus of the gore and side seam. They just let the top of the gore run out to the outside and tacked it down.
Fig 7[/caption]
Fig 5 has the gores laid out in that fashion. The trapezoid in the center is the side gore. Fig 6 has the gores cut out, ready for installation.
Figs 7 and 8 are the gores pinned into the body. Already the skirts look like they're going to have damn near Captain Jack Harkness levels of swish.
That's a thing I can live with. Ask anyone.
Check out the detail in Fig 8. This is the result of us futzing around trying to replicate a unique detail on the original.
Fig 9 is a sketch of the original. Look closely at the top of the side gores.
The top of each gore is outside the body of the coat. It's like they decided to just not set the gore "properly," where the point is enclosed in the nexus of the gore and side seam. They just let the top of the gore run out to the outside and tacked it down. 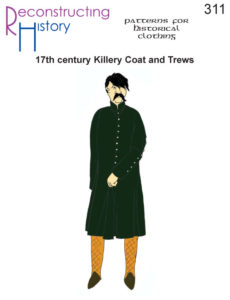 [caption id="attachment_18025" align="alignleft" width="191"]
 Fig 9[/caption]
So that's what we did. It's going to take some doing, unlearning how to set a gore (after much blood, toil, tears, and sweat figuring out how to do it). But I shall persevere.
Stay tuned to next week's episode! I'm planning to have a collar figured out. But heaven knows what the future has in store.
In the meantime, why not pre-order your very own copy of the Killery pattern? Just click the cover image at right.
Also, Kass has started a Patreon. If you want to support this kind of work, please consider becoming a patron. Click the Patreon button below. Thanks!
* The side gores on the Killery Coat as it exists are in two pieces, too, like the front and back, but they're sewn from narrow gores into a larger gore.
Fig 9[/caption]
So that's what we did. It's going to take some doing, unlearning how to set a gore (after much blood, toil, tears, and sweat figuring out how to do it). But I shall persevere.
Stay tuned to next week's episode! I'm planning to have a collar figured out. But heaven knows what the future has in store.
In the meantime, why not pre-order your very own copy of the Killery pattern? Just click the cover image at right.
Also, Kass has started a Patreon. If you want to support this kind of work, please consider becoming a patron. Click the Patreon button below. Thanks!
* The side gores on the Killery Coat as it exists are in two pieces, too, like the front and back, but they're sewn from narrow gores into a larger gore.
Fig 1[/caption]
[caption id="attachment_18470" align="alignright" width="224"] Fig 2[/caption]
...and a little more about the body, which we discussed last time.
So the rectangles which make up the body are now on my dress dummy. The shoulder "seams" are pinned into place.
Well, I say place. We're still futzing with it. Because in the interest of keeping this as simple as Kass thinks the Killery Coat is made, we're not cutting a neckline out of the back piece.
(The pics are really crappy. Again, my phone hasn't got the best camera.)
Take a look at the images. The back view (Fig 2) has no shaping to the top of the back piece at all. It's just placed at the spot on the back of the neck where we want it to end up. Then the fronts are pinned along the shoulder seam to damn near the center-back line (don't forget the fronts are the same size rectangle as the back, except the rectangle is slit up the middle).
[caption id="attachment_18471" align="alignleft" width="224"] Fig 3[/caption]
[caption id="attachment_18472" align="alignright" width="300"] Fig 4[/caption]
The cool part is when you do that the fronts start looking like the Killery as it exists. See Fig 1.
There will be more on the collar and how it attaches in later installments. You're going to have to stay tuned for that.
Before I go on to the gores, let me put in a word about tools. USE GOOD SCISSORS. If you're going to use wool as thick as the melton I chose, it takes a machete or a hacksaw or laser beams or some shit to get through more than one layer of it. I thought I had a pretty decent pair of scissors. Got 'em at Joann. Nice and sharp. Cuts the hell out of my fingers when I'm not being careful. I'm not allowed to run with them. Should be good, right?
Not really, no. Hacking through two layers was an arthritic trial. So get good, sharp scissors and make sure they stay sharp.
Oh, and before we get into why you need good scissors, take a look at the crumpled up piece of paper in Fig 3.
[caption id="attachment_18473" align="alignleft" width="300"] Fig 5[/caption]
See that? That's what happens when you throw the crucially important piece of paper you thought was good only for recycling but which has a bunch of really important measurements you absolutely need scribbled on it in pencil. Stuff your costume-historian wife carefully and kindly wrote out for you. Stuff based on her getting onto an airplane and flying to Ireland so she could make a careful examination of an extant garment. Stuff that lets you cut the right kind of gores in the right shapes with the right measurements.
Yeah, don't throw that away. If you do, you'll go diving in to the garbage cans looking for it. Take it from me, folks.
[caption id="attachment_18474" align="alignright" width="300"] Fig 6[/caption]
After retrieving my essential data from the trash, I set to work on the fabric cutting part of today's adventure. First I had to lay out what I was going to cut.
The gores are simple trapezoids cut on the straight. There's a total of six - one for each side seam, and two each for the front and back openings. The front and back gores are essentially the same size as the side gores, just slit up the middle. This lets the Coat open in front. The back one lets you sit a horse.*
Two layers of fabric (remember what I said about the scissors?) are laid out in Fig 4.
Time for a word about loom widths. On the original Killery, the big pieces are mostly loom widths, commonly 20 to 22 inches wide. When you keep the pieces to simple rectangles or trapezoids cut from rectangles, you get very, very little waste. That's important when you're a dirt-poor bog-trotter and material is super expensive.
[caption id="attachment_18480" align="alignright" width="224"] Fig 8[/caption]
[caption id="attachment_18478" align="alignleft" width="224"] Fig 7[/caption]
Fig 5 has the gores laid out in that fashion. The trapezoid in the center is the side gore. Fig 6 has the gores cut out, ready for installation.
Figs 7 and 8 are the gores pinned into the body. Already the skirts look like they're going to have damn near Captain Jack Harkness levels of swish.
That's a thing I can live with. Ask anyone.
Check out the detail in Fig 8. This is the result of us futzing around trying to replicate a unique detail on the original.
Fig 9 is a sketch of the original. Look closely at the top of the side gores.
The top of each gore is outside the body of the coat. It's like they decided to just not set the gore "properly," where the point is enclosed in the nexus of the gore and side seam. They just let the top of the gore run out to the outside and tacked it down.
[caption id="attachment_18025" align="alignleft" width="191"] Fig 9[/caption]
So that's what we did. It's going to take some doing, unlearning how to set a gore (after much blood, toil, tears, and sweat figuring out how to do it). But I shall persevere.
Stay tuned to next week's episode! I'm planning to have a collar figured out. But heaven knows what the future has in store.
In the meantime, why not pre-order your very own copy of the Killery pattern? Just click the cover image at right.
Also, Kass has started a Patreon. If you want to support this kind of work, please consider becoming a patron. Click the Patreon button below. Thanks!
* The side gores on the Killery Coat as it exists are in two pieces, too, like the front and back, but they're sewn from narrow gores into a larger gore.